はじめに
ここではCCNxパケットを実際に飛ばして、様子を観察していきたいと思います。
その1でインストールしたCeforeをもう1台のUbuntuの動くPCにインストールできる人はそれで大丈夫です。WindowsやMacが1台しかないという人はDockerの環境で試してもらうのがいいでしょう。
Docker環境の構築
Docker Desktopをインストールしてdockerコマンドで環境を構築する例を示します。dockerコマンドが実行可能になった前提で進めていきます。
icn-docker-sample.zipファイルを展開し、Dockerfileとdocker-compose.ymlを置いたディレクトリで以下のコマンドを実行します:
docker compose up -d端末をひとつ使って以下のコマンドを実行すると、コンテナcefore-node1でコマンド実行ができます:
docker exec -it cefore-node1 bashもうひとつ端末を使って以下のコマンドを実行することで、もう1つのコンテナcefore-node2でコマンド実行ができます:
docker exec -it cefore-node2 bashこれらの2つのコンテナではすでにCefore(バージョン0.10.0g)が導入済みです。cefnetdstartでcefnetdを起動し、cefstatusで起動中であることを確認しておきましょう。両方のコンテナで実行しておきます。
基本的な通信テスト
Node1でのファイル登録
それでは「その1」でやったように、cefore-node1でcefputfileしてみましょう。
cefputfile ccnx:/test -f test.txtcefore-node1のCS_MODEが1以上であればこのデータはキャッシュされます。
cefore@cefore-node1:~$ cefputfile ccnx:/test -f test.txt
[cefputfile] Start
[cefputfile] Parsing parameters ... OK
[cefputfile] Init Cefore Client package ... OK
[cefputfile] Conversion from URI into Name ... OK
[cefputfile] Checking the input file ... OK
[cefputfile] Connect to cefnetd ... OK
[cefputfile] URI         = ccnx:/test
[cefputfile] File        = test.txt
[cefputfile] Rate        = 5.000 Mbps
[cefputfile] Block Size  = 1024 Bytes
[cefputfile] Cache Time  = 300 sec
[cefputfile] Expiration  = 3600 sec
[cefputfile] Start creating Content Objects
[cefputfile] Unconnect to cefnetd ... OK
[cefputfile] Terminate
[cefputfile] Tx Frames  = 1
[cefputfile] Tx Bytes   = 16
[cefputfile] Duration   = 0.004 sec
[cefputfile] Throughput = 39372 bps
Node2からのアクセス試行(失敗例)
次にcefore-node2からcefore-node1にアクセスして、このccnx:/testを取得してみましょう。
cefgetfile ccnx:/test -f output.datこのコマンドは自身のホストcefore-node2で動いているcefore (cefnetd) にinterestを投げるもので、このノードにはないコンテンツですのでceforeはinterestを転送しようとするのですが、転送のための参照テーブル (Forwarding Interest Base: FIB) にこのCCNx URIが登録されていません。したがって取得は失敗します。
cefore@cefore-node2:~$ cefgetfile ccnx:/test -f output.dat
[cefgetfile] Start
[cefgetfile] Parsing parameters ... OK
[cefgetfile] Init Cefore Client package ... OK
[cefgetfile] Conversion from URI into Name ... OK
[cefgetfile] Checking the output file ... OK
[cefgetfile] Connect to cefnetd ... OK
[cefgetfile] URI=ccnx:/test
[cefgetfile] Start sending Interests
[cefgetfile] Suspended to retrieve the content because the number of Interest retransmission has reached its limit, 5.
[cefgetfile] Unconnect to cefnetd ... OK
[cefgetfile] Terminate
[cefgetfile] Rx Frames (All)           = 0
[cefgetfile] Rx Frames (ContentObject) = 0
[cefgetfile] Received frame ... NG
[cefgetfile] Could not receive anything
このとき、cefstatusを実行してみると、FIBにエントリがないことがわかります。
cefore@cefore-node2:~$ cefstatus
CCNx Version     : 1
Port             : 9896
Rx Interest      : 0 (RGL[0], SYM[0], SEL[0])
Tx Interest      : 0 (RGL[0], SYM[0], SEL[0])
Rx ContentObject : 0
Tx ContentObject : 0
Cache Mode       : Localcache
FWD Strategy     : default
Faces : 6
  faceid =   4 : IPv4 Listen face (udp)
  faceid =   0 : Local face
  faceid =  16 : Local face
  faceid =   5 : IPv6 Listen face (udp)
  faceid =   6 : IPv4 Listen face (tcp)
  faceid =   7 : IPv6 Listen face (tcp)
FIB(App) :
  Entry is empty
FIB :
  Entry is empty
PIT(App) :
  Entry is empty
PIT :
  Entry is empty
ルーティング設定
FIBにinterestの転送先としてcefore-node1を登録するにはどうしたらいいのでしょうか。interestをルーティングするという意味でcefrouteというコマンドが用意されています。cefore-node1のIPアドレスが10.1.1.11であれば以下のように実行します。
cefroute add ccnx:/test udp 10.1.1.11 9896確かにFIBができたことはcefstatusコマンドでも確認できます。
cefore@cefore-node2:~$ cefstatus
CCNx Version     : 1
Port             : 9896
Rx Interest      : 56 (RGL[56], SYM[0], SEL[0])
Tx Interest      : 8 (RGL[8], SYM[0], SEL[0])
Rx ContentObject : 1
Tx ContentObject : 1
Cache Mode       : Localcache
FWD Strategy     : default
Faces : 8
  faceid =  19 : address = 10.1.1.11:9896 (udp)
  faceid =   4 : IPv4 Listen face (udp)
  faceid =   0 : Local face
  faceid =  22 : Local face
  faceid =  20 : address = 0.0.38.168:9896 (udp)
  faceid =   5 : IPv6 Listen face (udp)
  faceid =   6 : IPv4 Listen face (tcp)
  faceid =   7 : IPv6 Listen face (tcp)
FIB(App) :
  Entry is empty
FIB : 1
  ccnx:/
    Faces : 19 (-s-) RtCost=0
            20 (-s-) RtCost=0
PIT(App) :
  Entry is empty
PIT :
  Entry is empty
成功例
それではcefgetfileを再度実行してみましょう。今度はちゃんと取得できるはずです。
cefore@cefore-node2:~$ cefgetfile ccnx:/test -f output.dat
[cefgetfile] Start
[cefgetfile] Parsing parameters ... OK
[cefgetfile] Init Cefore Client package ... OK
[cefgetfile] Conversion from URI into Name ... OK
[cefgetfile] Checking the output file ... OK
[cefgetfile] Connect to cefnetd ... OK
[cefgetfile] URI=ccnx:/test
[cefgetfile] Start sending Interests
[cefgetfile] Completed to get all the chunks.
[cefgetfile] Unconnect to cefnetd ... OK
[cefgetfile] Terminate
[cefgetfile] Rx Frames (All)           = 1
[cefgetfile] Rx Frames (ContentObject) = 1
[cefgetfile] Rx Bytes (All)            = 32
[cefgetfile] Rx Bytes (ContentObject)  = 16
[cefgetfile] Duration                  = 0.000 sec
[cefgetfile] Jitter (Ave)              = 0 us
[cefgetfile] Jitter (Max)              = 0 us
[cefgetfile] Jitter (Var)              = 0 us
パケット解析
このときのCCNxパケットのやりとりをWiresharkでキャプチャしてみましょう。
tcpdumpがなければsudo apt install tcpdumpで導入し、tcpdump -i eth0 -w cefore.dmp udp port 9896のようにキャプチャすることを想定しています。
githubのceforeのリポジトリからLUAファイルをもってきてWiresharkに登録すると、CCNxパケットが解析できて便利です。CeforeのCCNx実装はIPのオーバーレイですので、UDPパケットの中にCCNxパケットがおさまっている形になっています。
Fixed Headerの解析
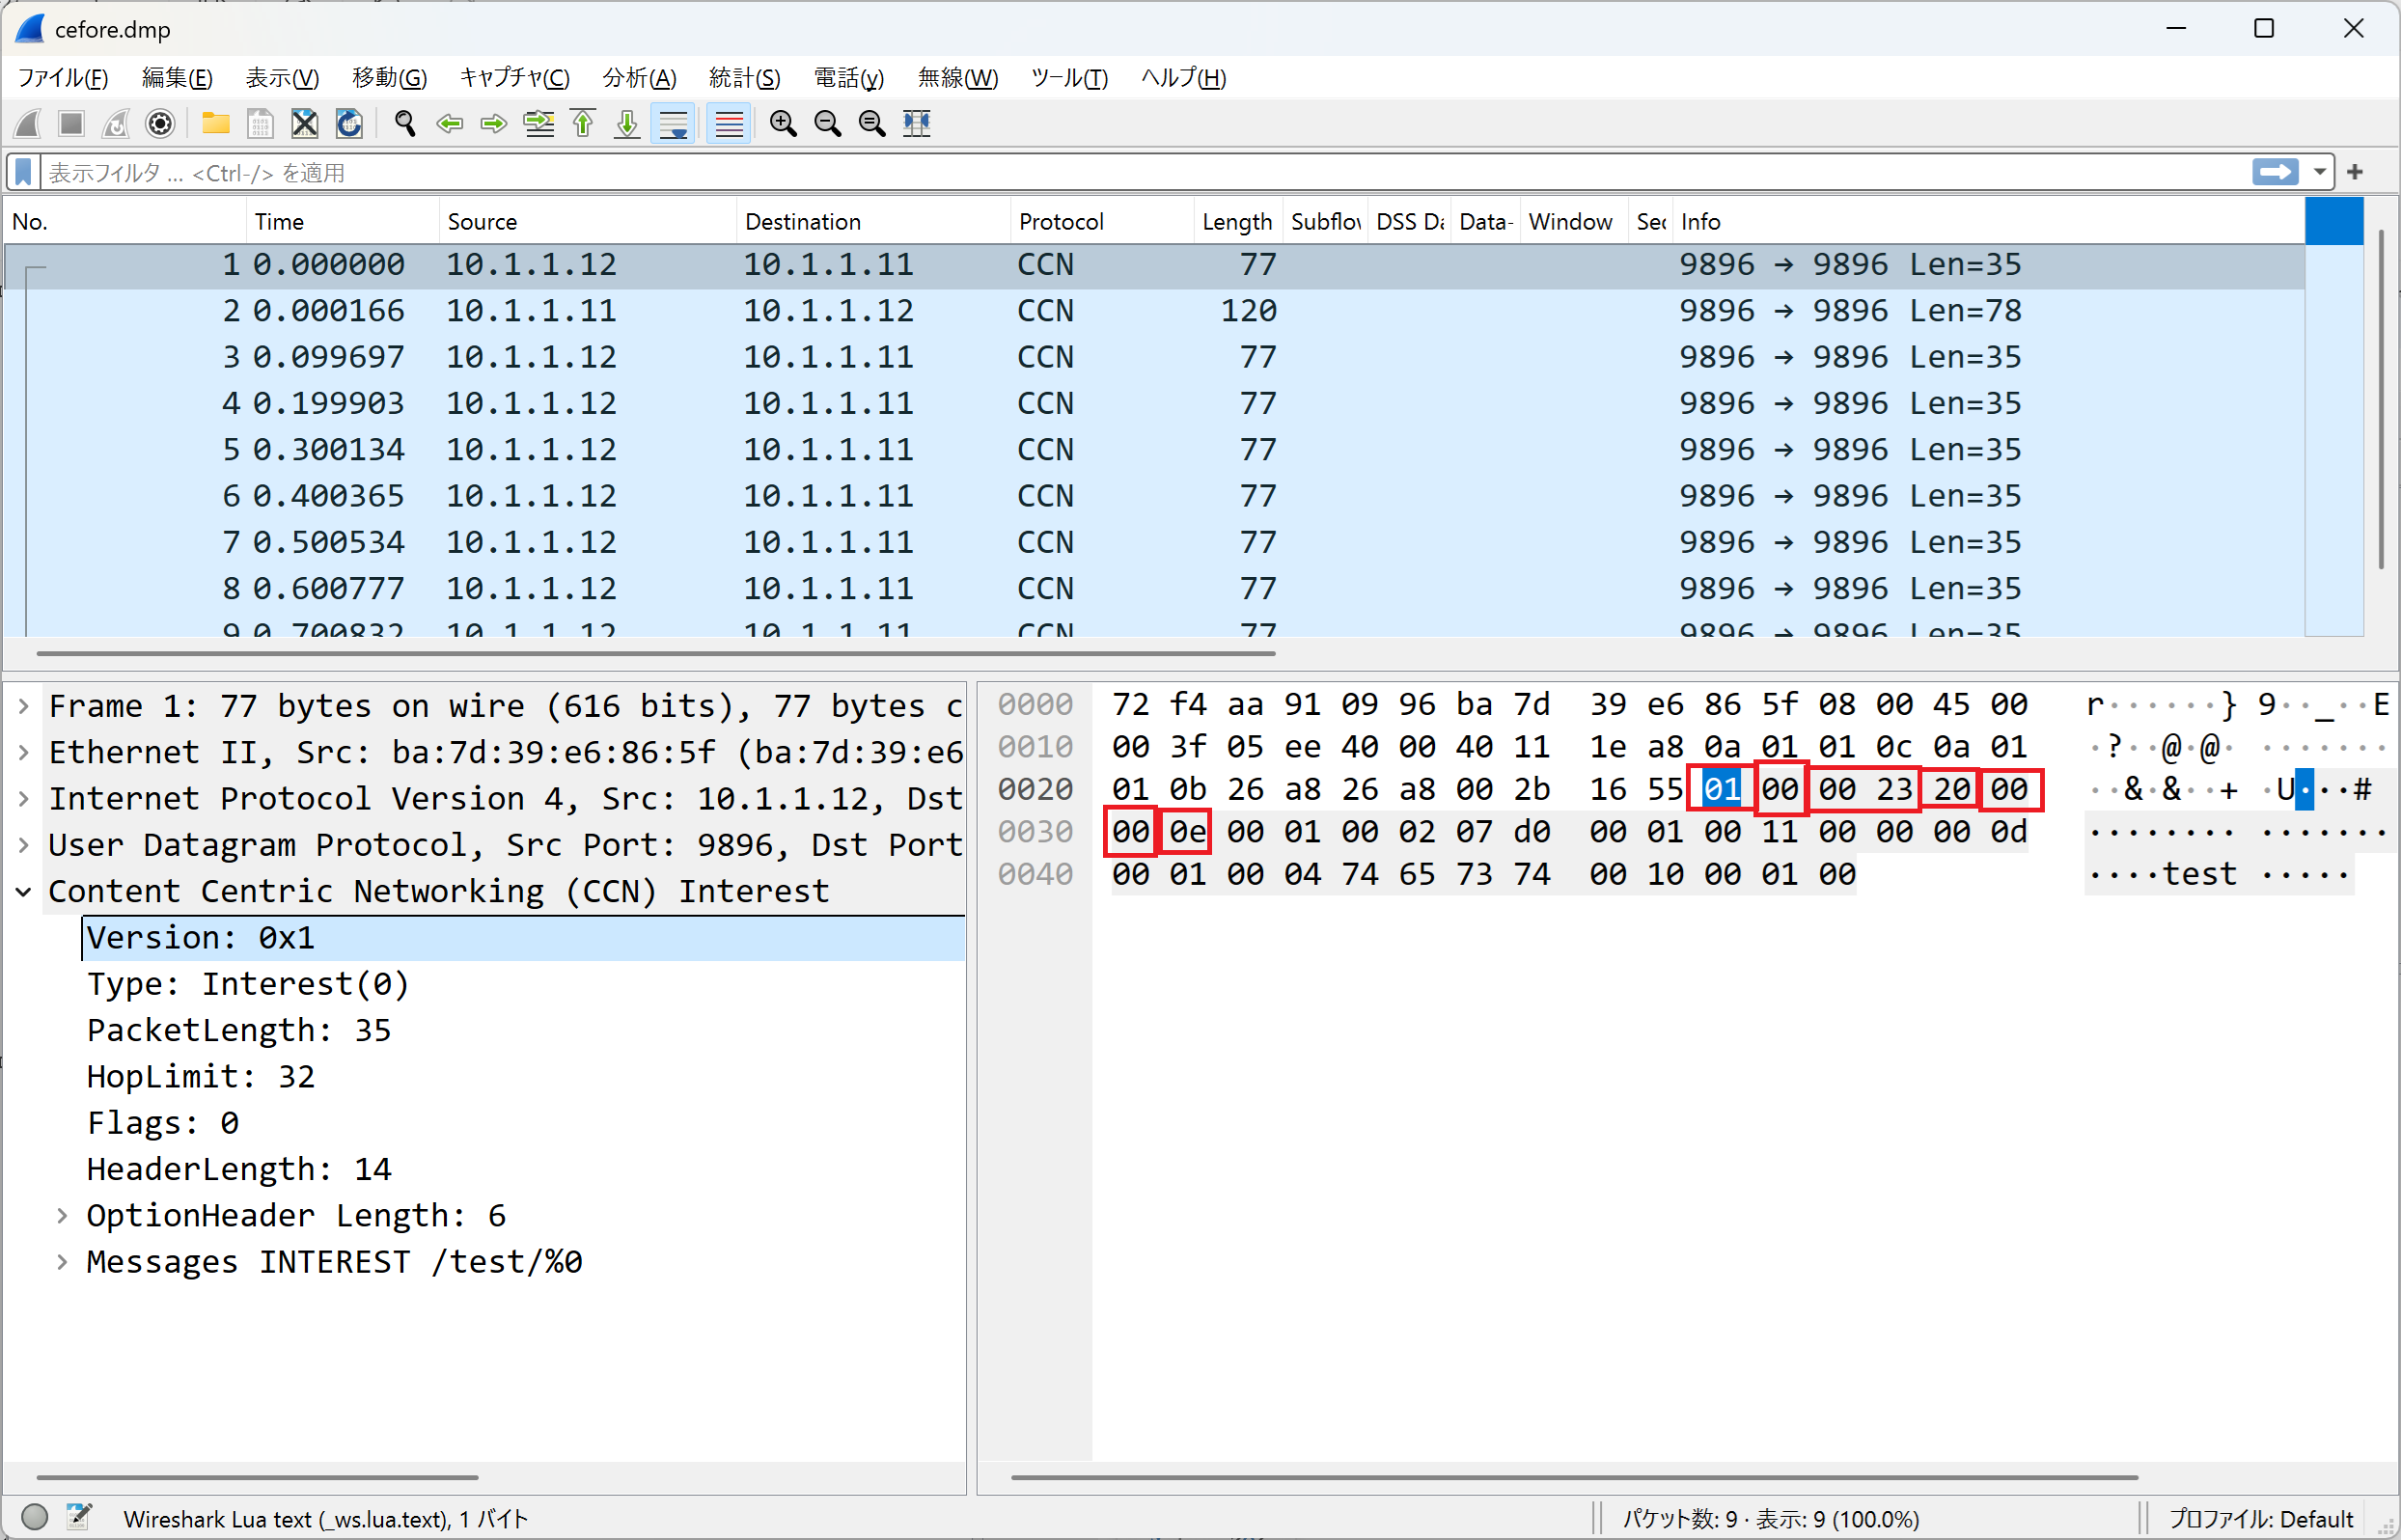
以下のRFC8609の記述と対応させると、8バイトのfixed header(固定ヘッダ)部分は以下の値であることがわかります。※値は特に断らない限り、10進数に直して示します
- Version = 1
- Packet Type = PT_INTEREST (0)
- PacketLength = 35 (0x23: 16*2+3=35)
- HopLimit = 32 (0x20: 16*2=32)
- Reserved = 0
- Flags = 0
- HeaderLength = 14 (0x0e: 14)
Fixed Header Format
                        1                   2                   3
    0 1 2 3 4 5 6 7 8 9 0 1 2 3 4 5 6 7 8 9 0 1 2 3 4 5 6 7 8 9 0 1
   +---------------+---------------+---------------+---------------+
   |    Version    |  PT_INTEREST  |         PacketLength          |
   +---------------+---------------+---------------+---------------+
   |   HopLimit    |   Reserved    |     Flags     | HeaderLength  |
   +---------------+---------------+---------------+---------------+
固定ヘッダが8バイトでヘッダ長が14バイトであることからオプションヘッダが6バイト入っていることがわかります。
Option Headerの解析
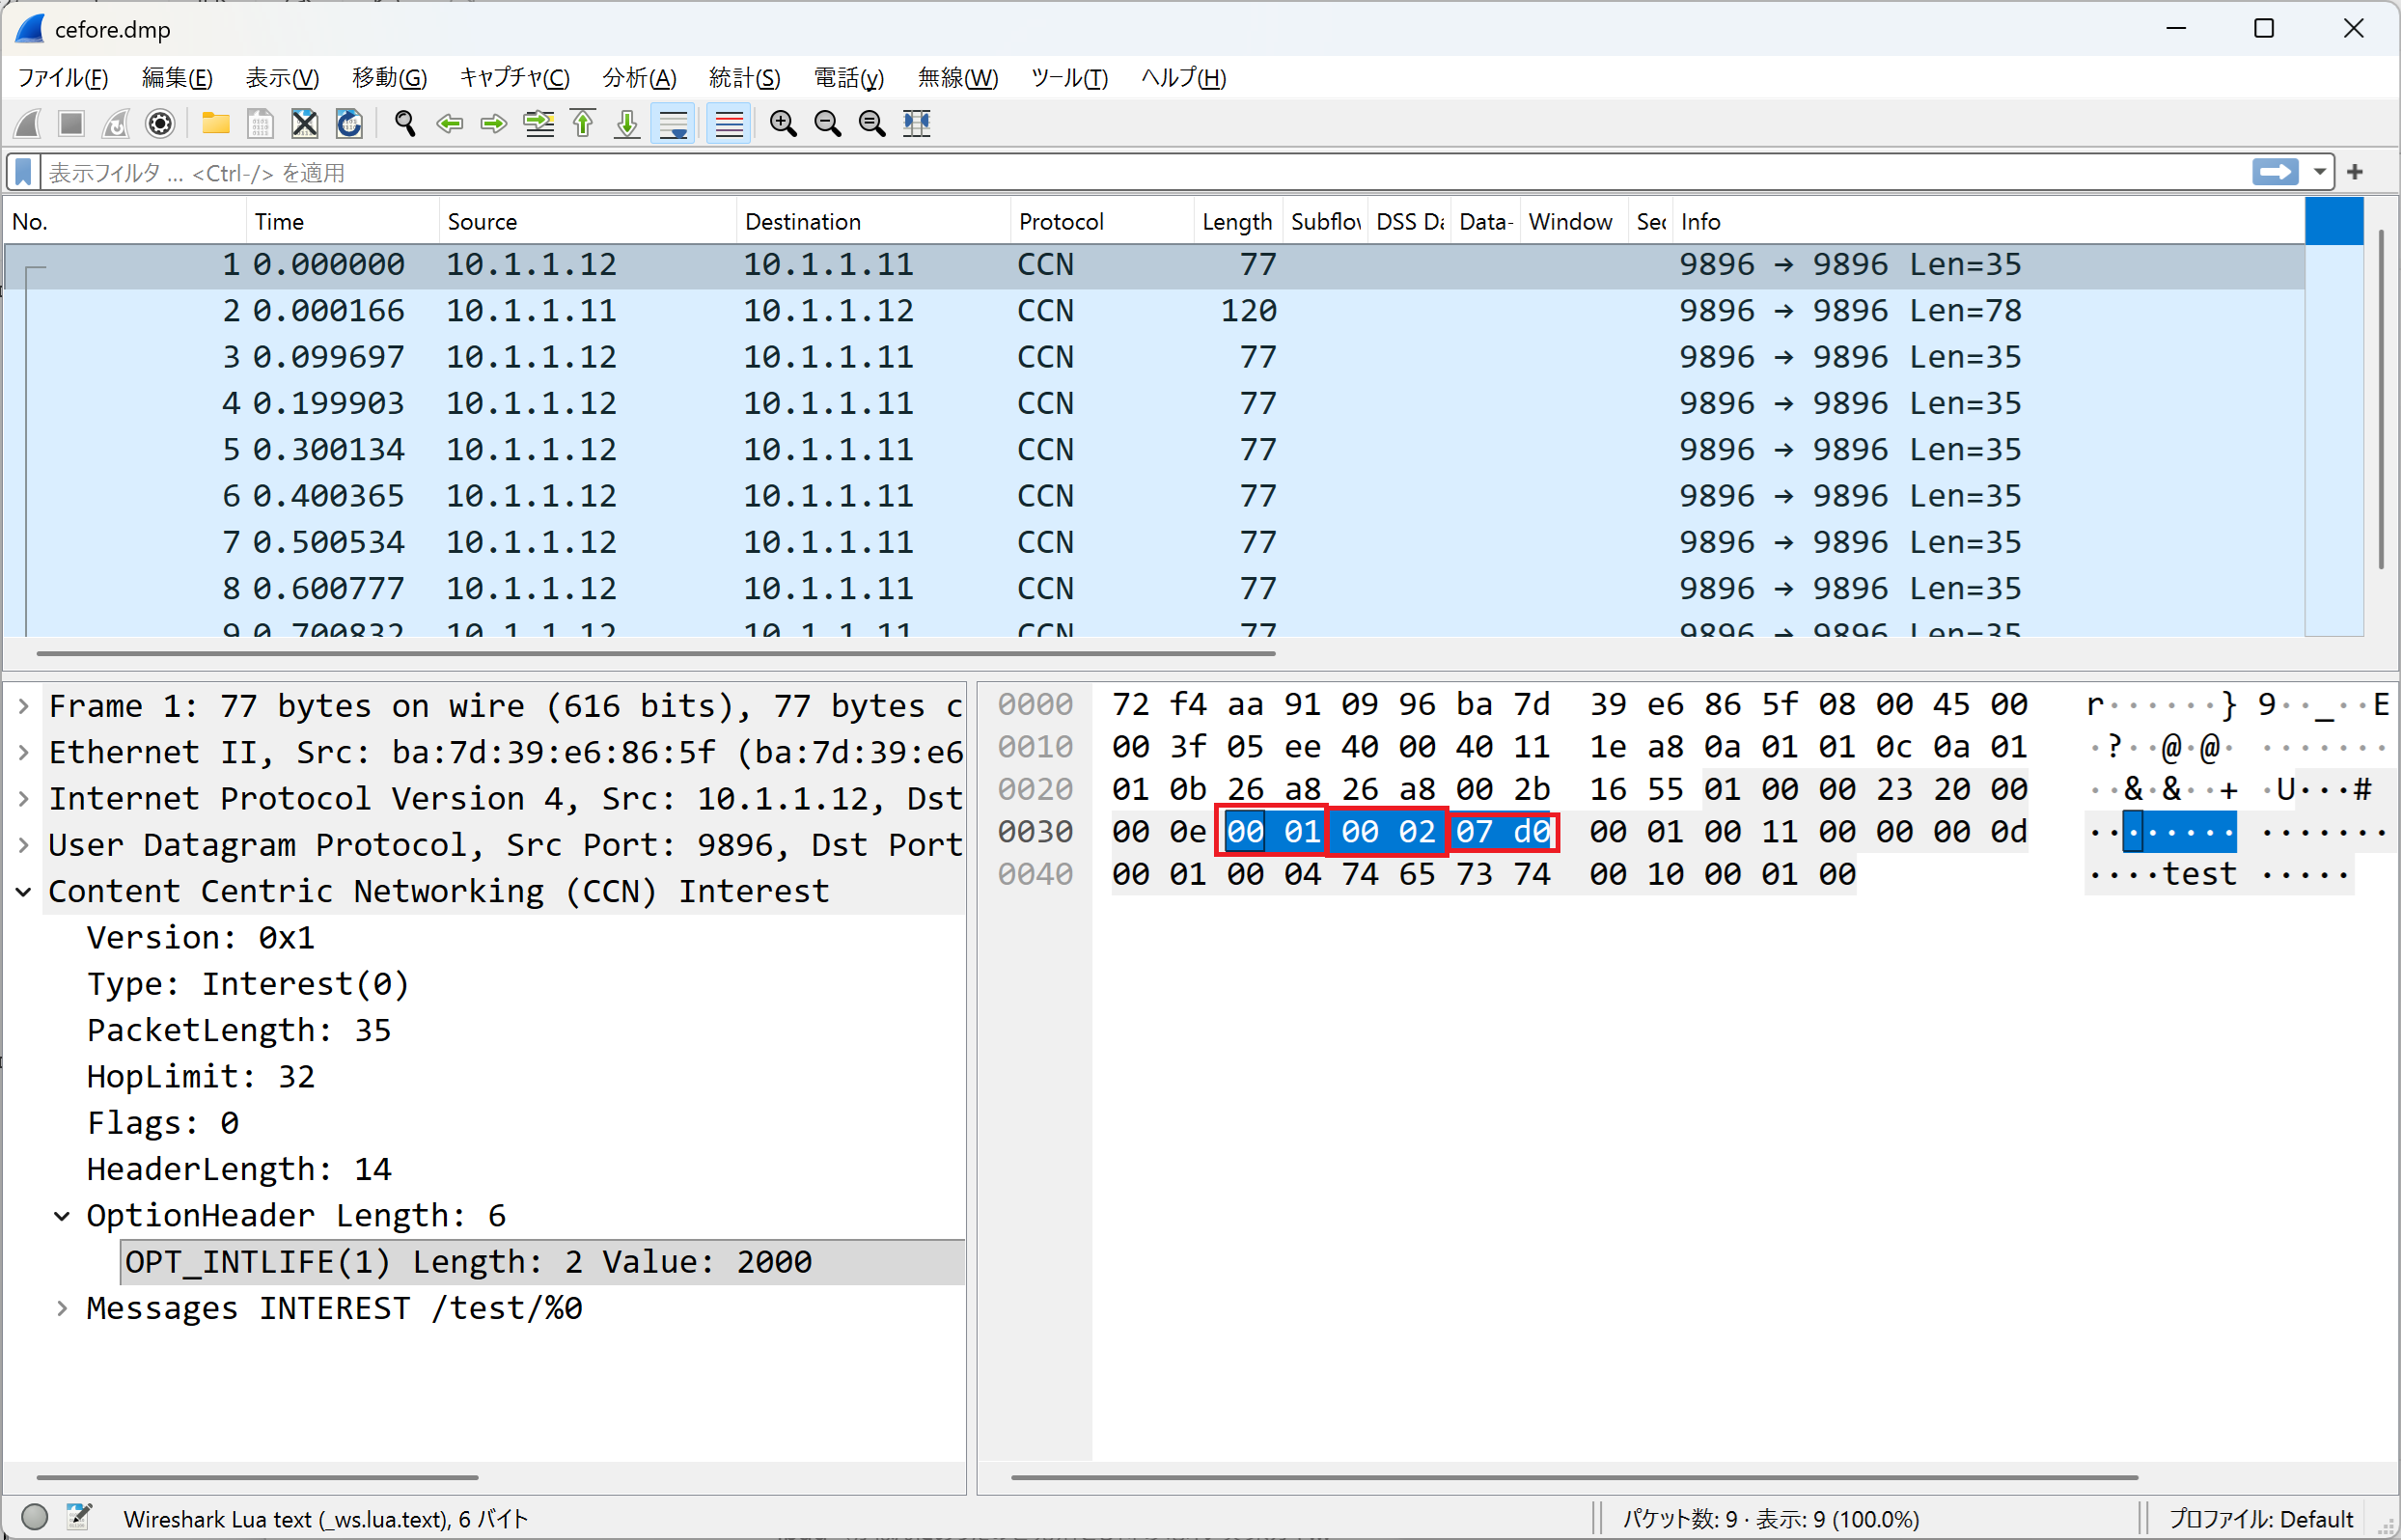
オプションヘッダ(Hop-by-Hop TLV headers)は以下のパケットフォーマットとの対応で次の値となります:
- option type = T_INTLIFE (1)
- Length = 2 [bytes]
- Lifetime = 2000 (0x07 0xd0: 256*7 + 13*16 = 2000) [ms]
このinterestの有効期間は2秒間ですね。
Option Header Format
                        1                   2                   3
    0 1 2 3 4 5 6 7 8 9 0 1 2 3 4 5 6 7 8 9 0 1 2 3 4 5 6 7 8 9 0 1
   +---------------+---------------+---------------+---------------+
   |          T_INTLIFE            |             Length            |
   +---------------+---------------+---------------+---------------+
   /                                                               /
   /                      Lifetime (Length octets)                 /
   /                                                               /
   +---------------+---------------+---------------+---------------+
CCNx Message TLVの解析
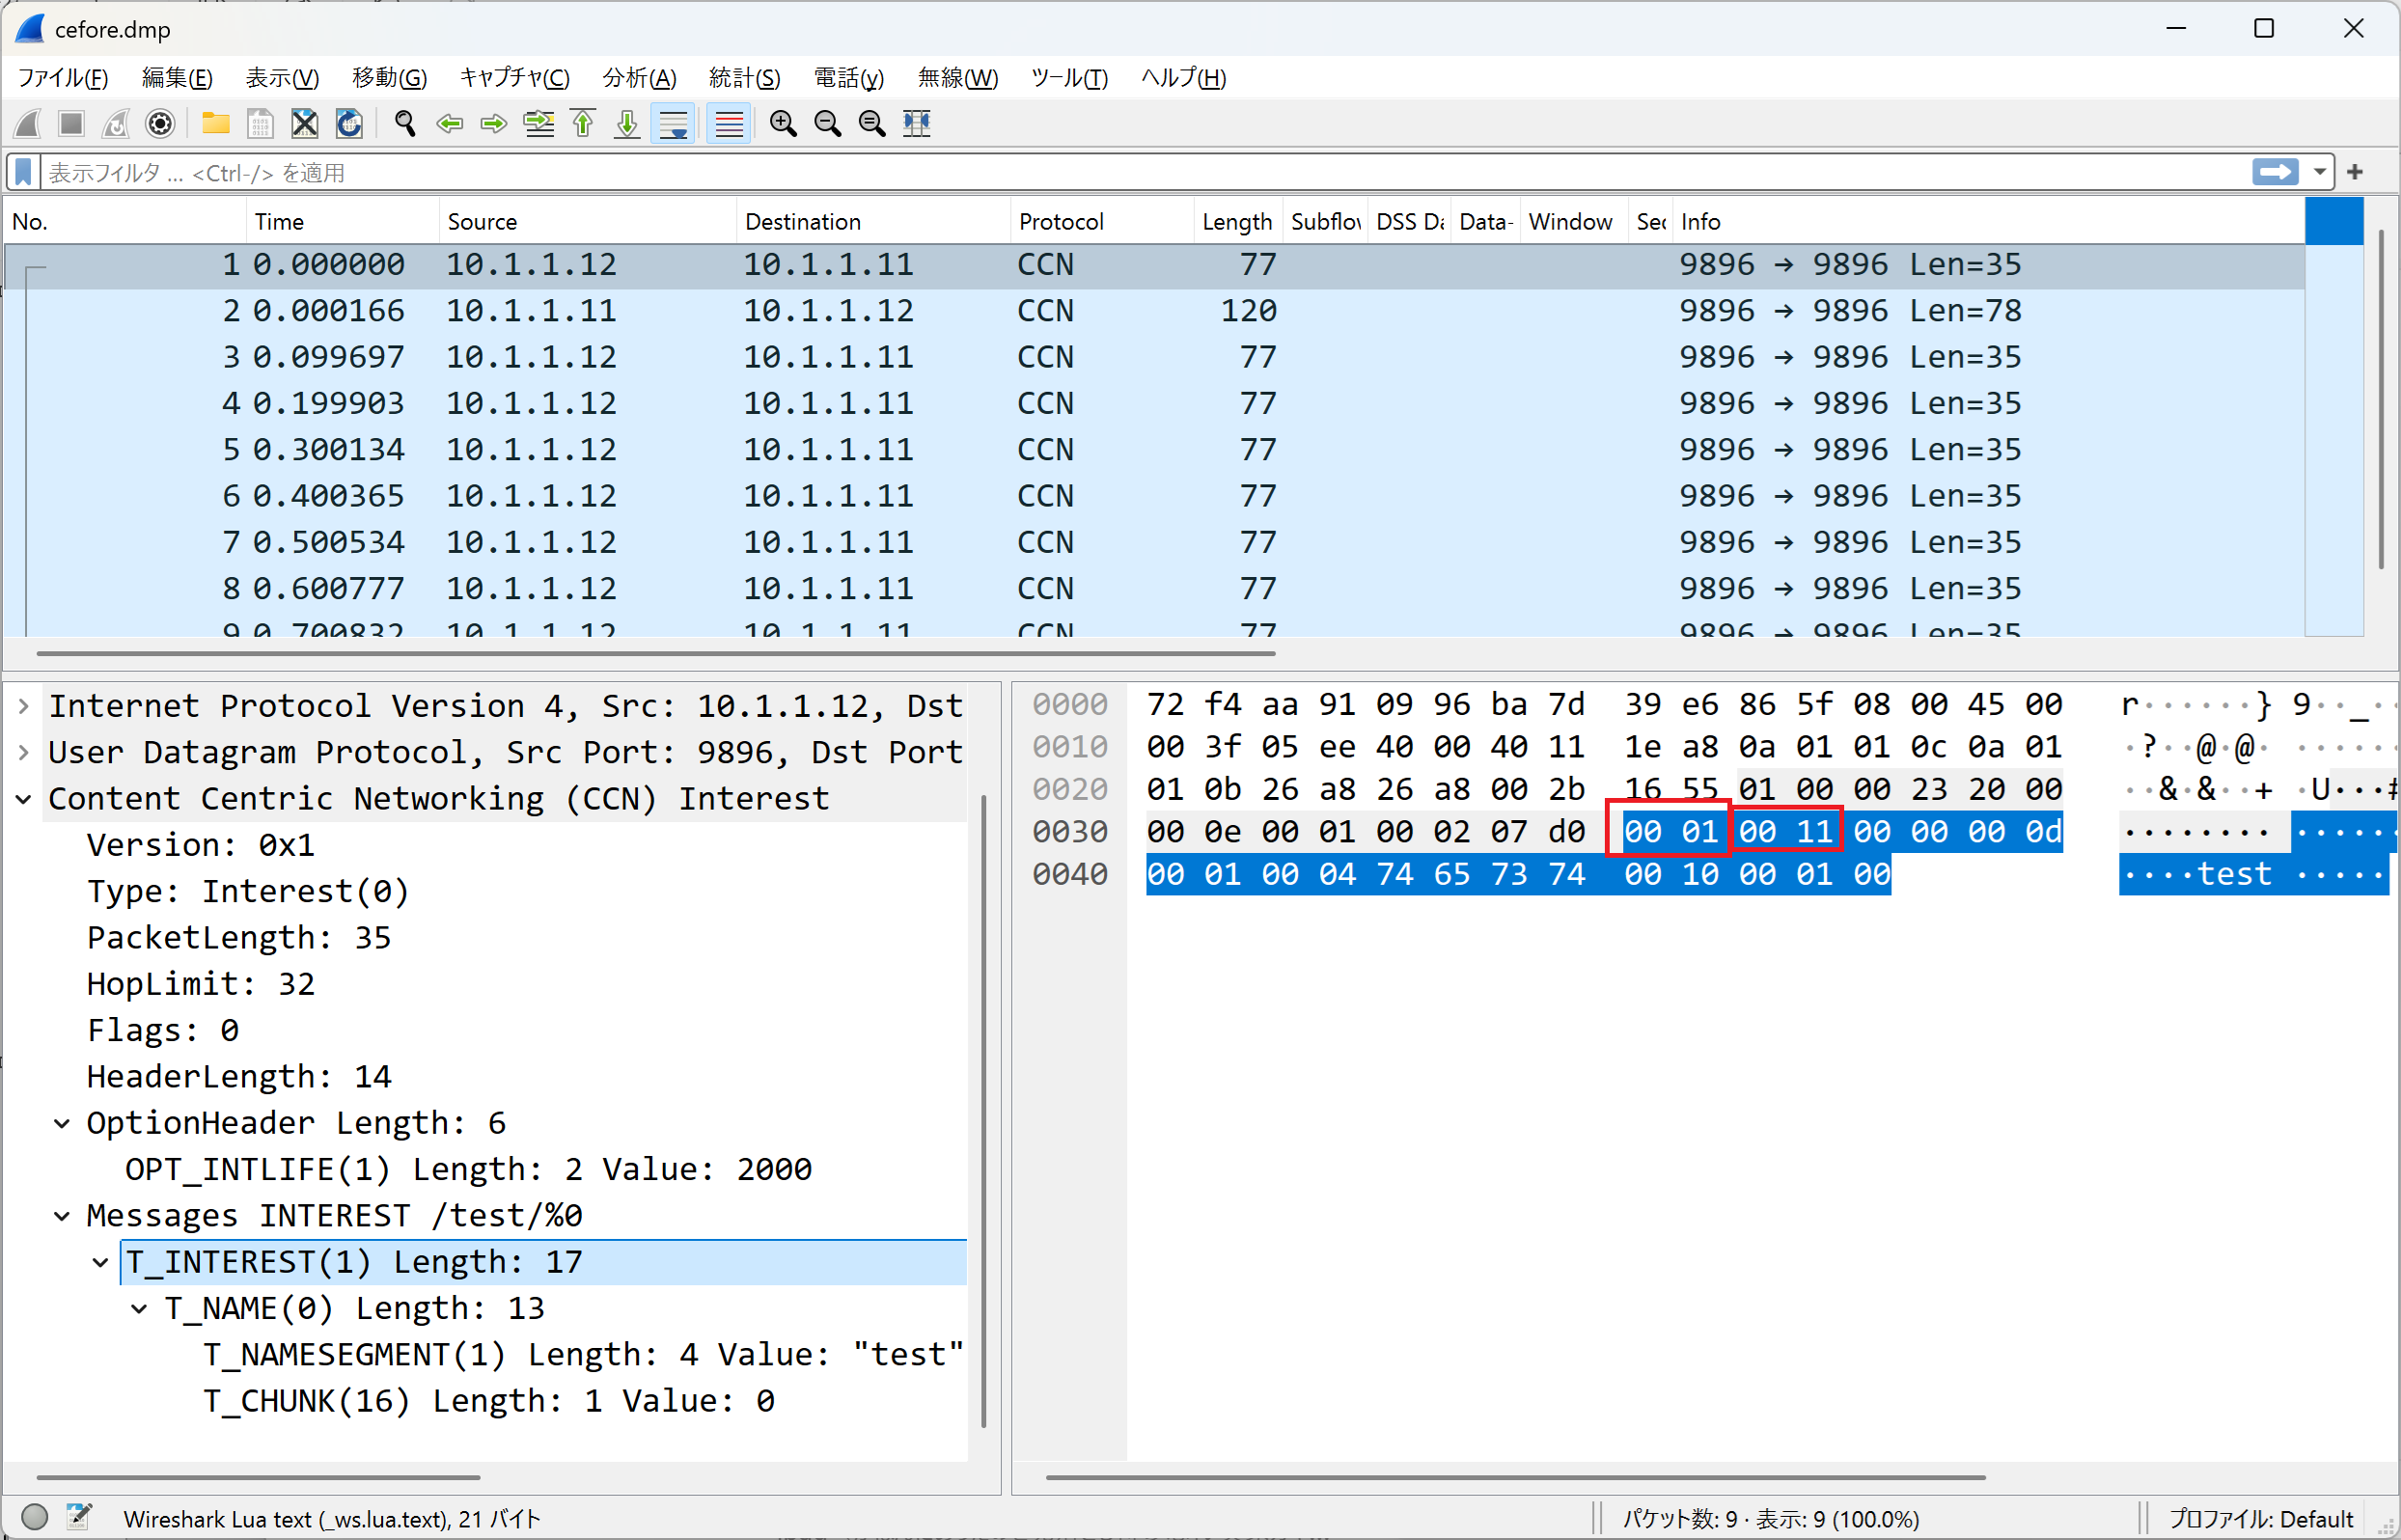
ヘッダが終わればあとはCCNx Message TLVになります。以下のパケットフォーマットとの対応で次の値であることがわかります:
- MessageType = T_INTEREST (1)
- MessageLength = 17
Message TLV Format
                        1                   2                   3
    0 1 2 3 4 5 6 7 8 9 0 1 2 3 4 5 6 7 8 9 0 1 2 3 4 5 6 7 8 9 0 1
   +---------------+---------------+---------------+---------------+
   |         MessageType           |         MessageLength         |
   +---------------+---------------+---------------+---------------+
   / Name TLV       (Type = T_NAME)                                /
   +---------------+---------------+---------------+---------------+
   / Optional Message TLVs   (Various Types)                       /
   +---------------+---------------+---------------+---------------+
   / Optional Payload TLV  (Type = T_PAYLOAD)                      /
   +---------------+---------------+---------------+---------------+
Name TLVの解析
メッセージとしてはName TLVが続いていることがわかります。中にはName segment TLVsが含まれることになります。以下のパケットフォーマットと対応づけると次の値になっています:
- Type = T_NAME (0)
- Length = 13 (Name TLV 8バイトとChunk TLV 5バイト)
Name TLV Format
                        1                   2                   3
    0 1 2 3 4 5 6 7 8 9 0 1 2 3 4 5 6 7 8 9 0 1 2 3 4 5 6 7 8 9 0 1
   +---------------+---------------+---------------+---------------+
   |            T_NAME             |            Length             |
   +---------------+---------------+---------------+---------------+
   / Name segment TLVs                                             /
   +---------------+---------------+---------------+---------------+
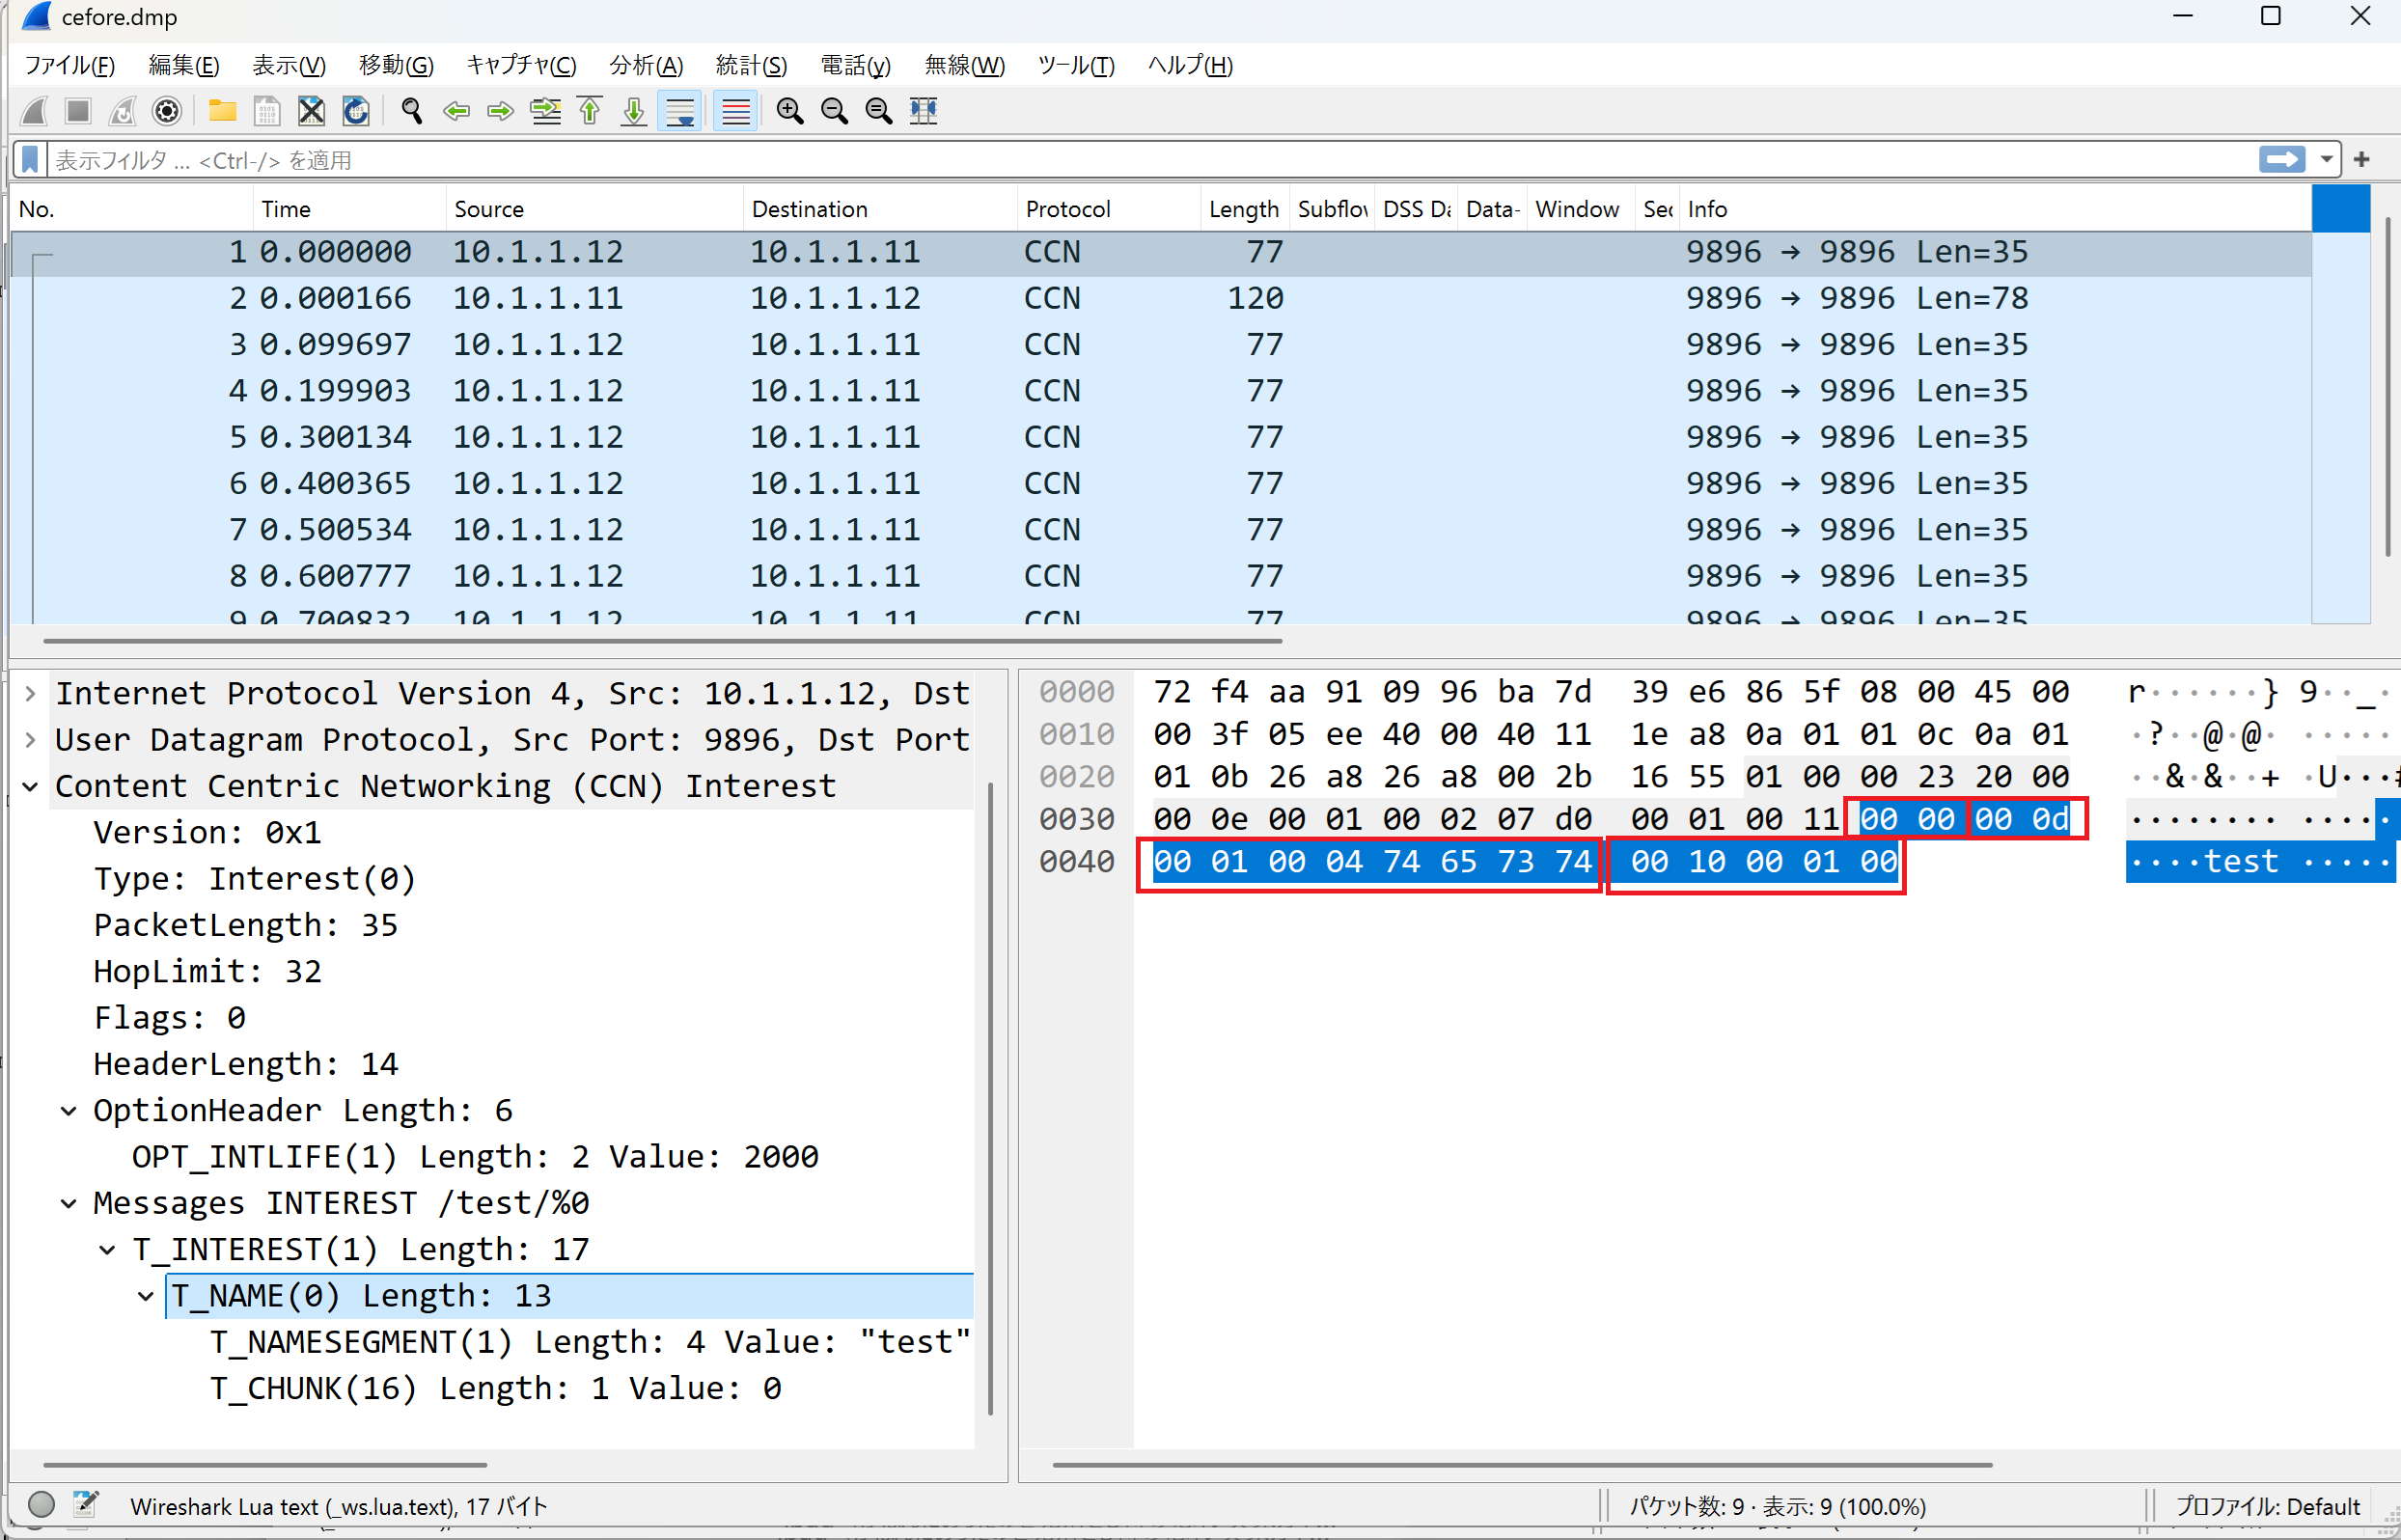
Name segment TLVをみていくと、以下のパケットフォーマット例に対応して次の値が指定されていることがわかります:
- Type = T_NAME_SEGMENT (1)
- Length = 4
- Value = "test" (0x74 0x65 0x73 0x74 の4バイト)
これらのName segmentを "/"でつなぎ、先頭にccnx:/をつけたものがURIですので、ここではccnx:/testが指定されています。
Name Segment Example
                        1                   2                   3
    0 1 2 3 4 5 6 7 8 9 0 1 2 3 4 5 6 7 8 9 0 1 2 3 4 5 6 7 8 9 0 1
   +---------------+---------------+---------------+---------------+
   |            (T_NAME)           |           0x14 (20)           |
   +---------------+---------------+---------------+---------------+
   |        (T_NAME_SEGMENT)       |           0x03 (3)            |
   +---------------+---------------+---------------+---------------+
   |       f                o               o      |(T_NAME_SEGMENT)
   +---------------+---------------+---------------+---------------+
   |               |            0x03 (3)           |       b       |
   +---------------+---------------+---------------+---------------+
   |      a                r       |           (T_NAME_SEGMENT)    |
   +---------------+---------------+---------------+---------------+
   |           0x02 (2)            |       h       |       i       |
   +---------------+---------------+---------------+---------------+
チャンク番号の解析
最後にチャンク番号がついていますが、Cefore0.10.0gは既述のように期限切れのinternet draft(draft-mosko-icnrg-ccnxchunking-02)の仕様に沿っています。
以下のパケットフォーマットとの対応でみると次の値であることがわかります:
- Type = T_CHUNK (16)
- Length = 1
- Number = 0
Chunk Number Format
                        1                   2                   3
    0 1 2 3 4 5 6 7 8 9 0 1 2 3 4 5 6 7 8 9 0 1 2 3 4 5 6 7 8 9 0 1
   +---------------+---------------+---------------+--------------+
   |           T_CHUNK             |             Length           |
   +---------------+---------------+---------------+--------------+
   |     variable length integer   /
   +---------------+---------------+
まとめ
ここまででCefore 0.10.0gでやりとりされるInterestパケットのフォーマットがわかってきたことと思います。(その3)ではContent Objectパケットの中身をみていきたいと思います。